What is new in 3.7 for administrators
This is an overview of new features and changes that are relevant for administrators.
Reset Meeting Server Password
From version 3.7, Meeting Management administrators can reset passwords for Meeting Server Admin accounts. In previous releases, if the Meeting Server admin password was forgotten, Meeting Server had to be reinstalled and configured. Administrators can now reset a forgotten or expired password for Meeting Server 1000 and Meeting Server on Virtualized deployments.
Password can be reset using the new Reset password button added in the Edit call bridge page. While resetting the password, the user is required to provide the previous password for validation. If the user has forgotten the password, they have the option to reset the password without validating the previous password. This can be configured using the new CMS password reset option added in the Advanced security settings tab. If this option is enabled, the user will not be prompted to enter the previous password while resetting the password.
Follow these steps to reset the password.
-
On the Servers page, scroll down to the call bridge and click the edit icon.
-
In the Edit call bridge page, click the Reset password button to launch the Reset Password pop-up window. The following fields are displayed:
-
Username – Displays the username of the MMP administrator.
-
Current password – Enter the password that is currently configured. This field will not be displayed if the CMS password reset option in the Advance security tab is checked. See section for details.
-
New password – Enter the new password for the Meeting Server. Meeting Management validates the new password against the criteria defined in the Meeting Server and displays error messages in case of invalid entries.
-
Confirm new password – Re-enter the new password.
-
-
Click Done.
Note: The system validates all fields entered in the reset password pop-up window. Administrators have three attempts to provide valid entries to reset the password, if unsuccessful, they can retry in two hours.

-
If the user has forgotten the previous password, configure the below setting to reset the password without validating the previous password:
-
On the Settings page, go to Advanced security tab.
-
In the CMS password reset section, the following setting is displayed:
Reset password without validating the previous password - Check this checkbox to enable password reset without validating the previous password. This option is unchecked by default.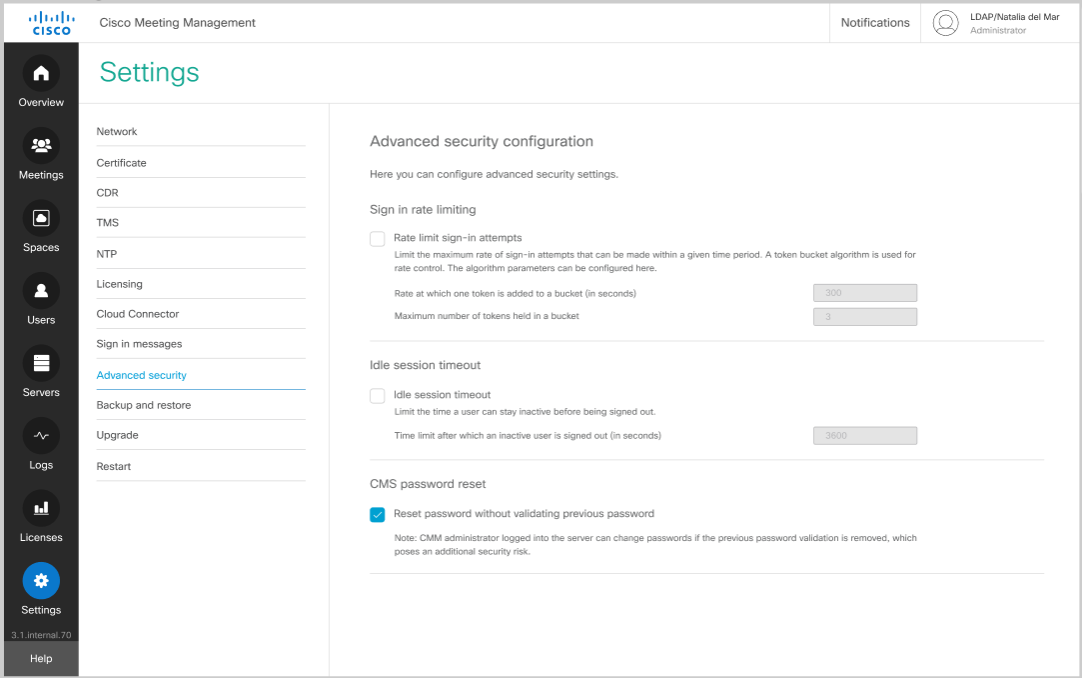
-
Click Save and restart Meeting Management.
Note: The Call Bridge API user credentials section in the Add Server page is now renamed to Admin Credentials. As in the previous releases, this section includes Username, Password and Display name fields.
Applying pane placement in custom layouts
Version 3.7 introduces the support for applying pane placements in custom layouts. Administrators and video operators can now place participants in specific panes in a custom layout.
The custom layouts defined in the Meeting Server will be listed in the pane placement window. To apply pane placement, click Meeting management > Meetings > Pane Placement. Turn on pane placement to select the custom layout from the list of available layouts and set the pane preference as required.
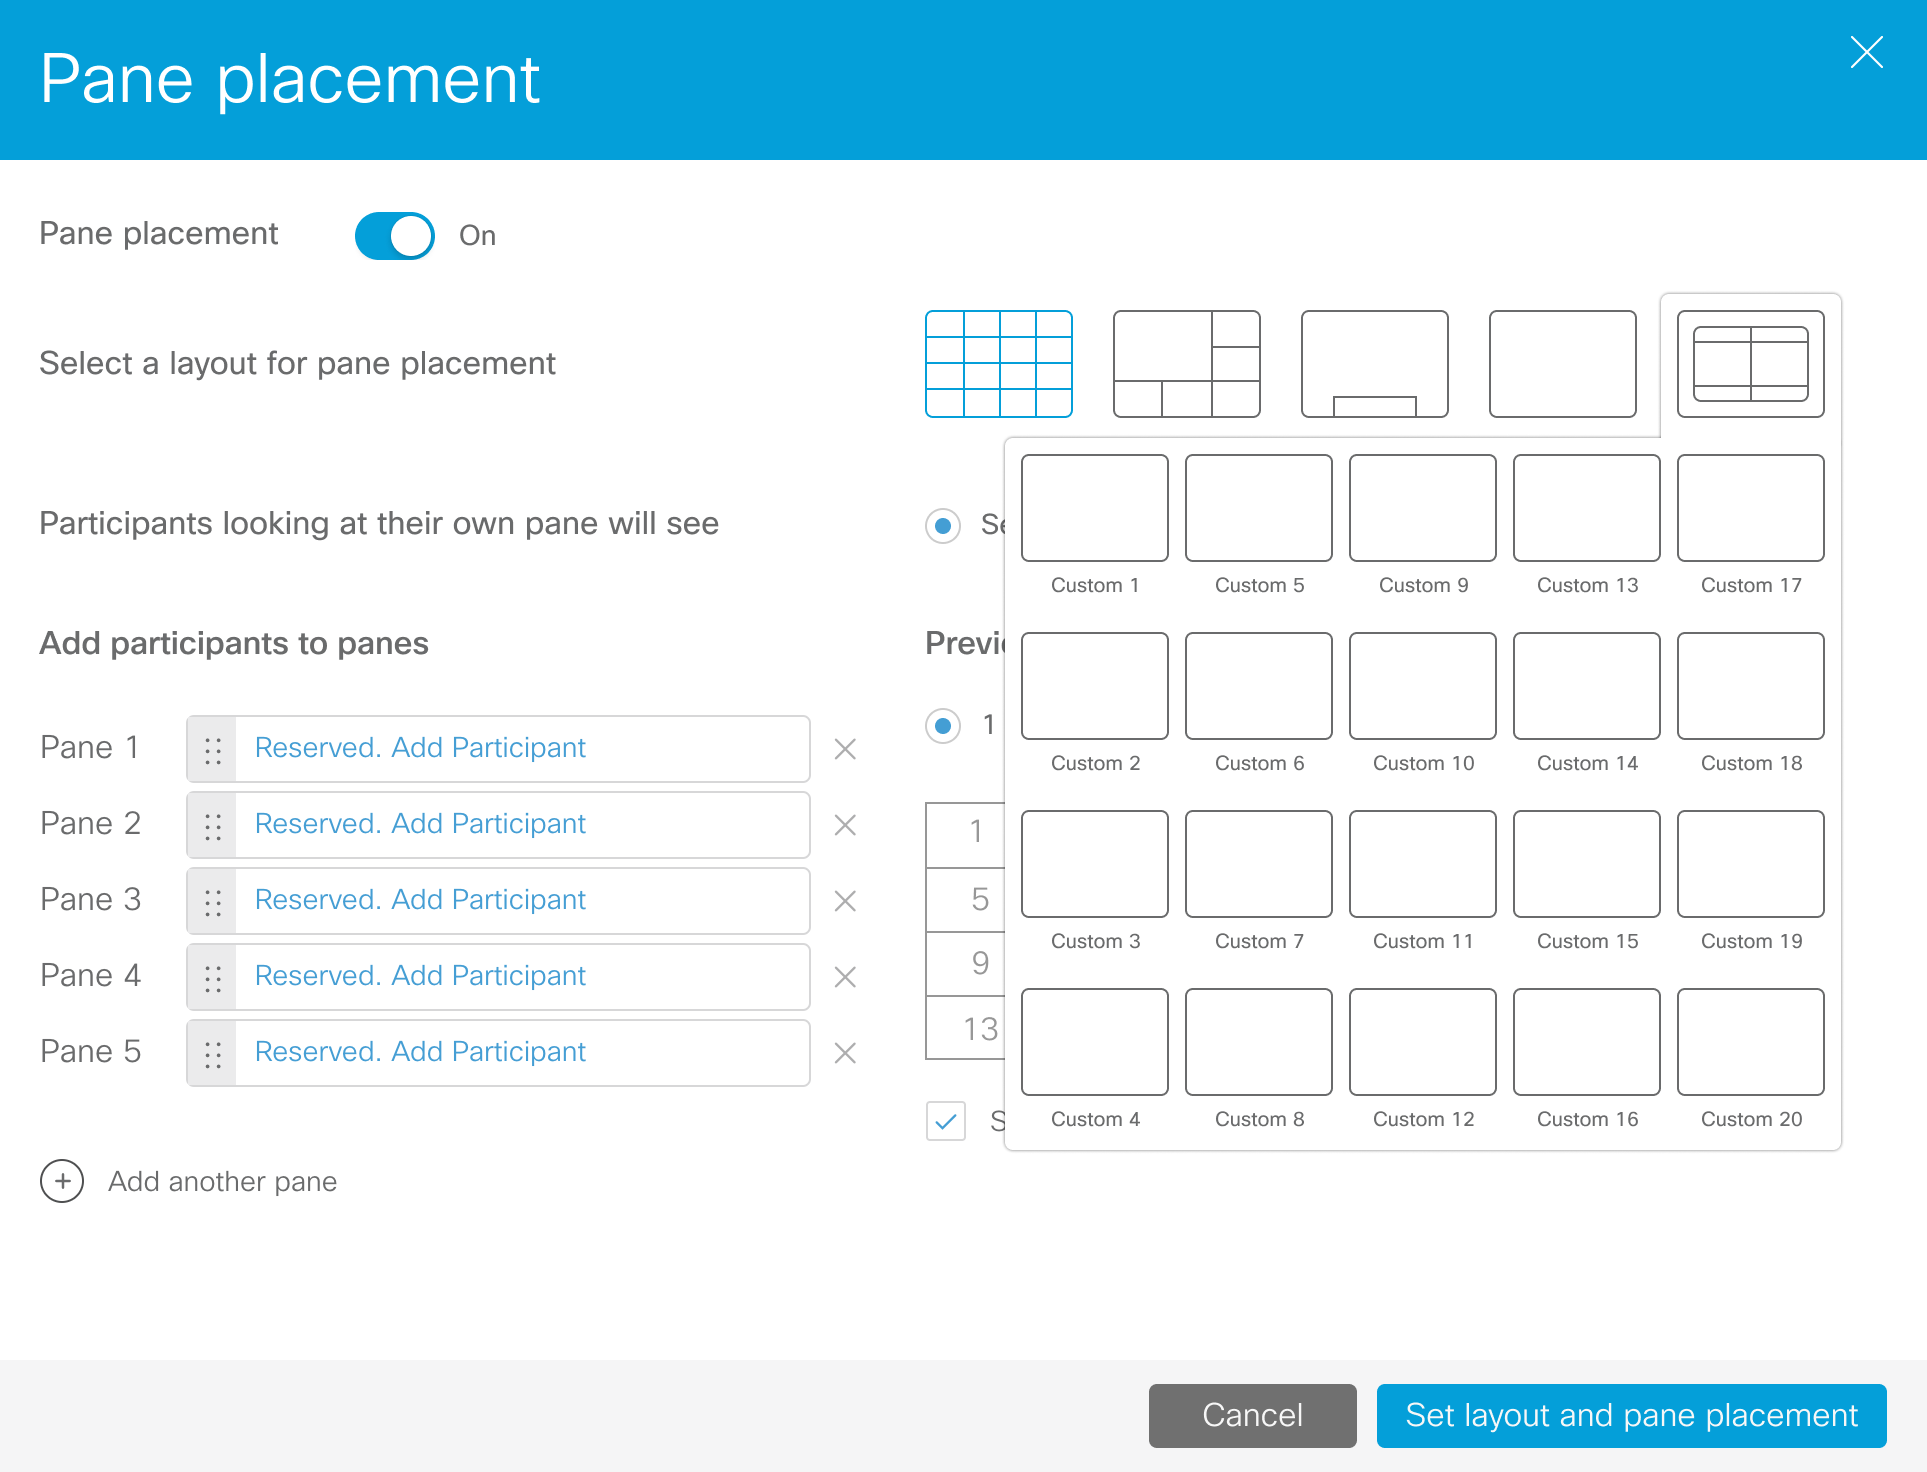
Note: Customizable layouts is a licensed feature. You need to purchase the necessary license for the custom layouts to be listed in the pane placement window.
Pane placement can be applied on a single server or a clustered deployment for ongoing meetings. This feature is supported on web app and SIP end points with single and dual screen endpoints.
Image signing
In previous versions the upgrade images were signed by Meeting Server to enhance the security when upgrading devices. From version 3.7, Meeting Management introduces signatures to Meeting Management upgrade images, and performs verification of the upgrade images (signature and integrity). Meeting Management uses these signatures to verify the authenticity of the upgrade images before each upgrade. This process is done automatically when administrators upgrade to a signed image and removes the need for manual verification.
Meeting Management uses the signatures to confirm whether the image is genuine and rejects the tampered images.
Note: Meeting Management does not support secure boot. The signature verification is only performed during an upgrade.
Image signatures are verified when upgrading from a signed image only. So, manual verification is still advised when upgrading from an unsigned image to a signed image, i.e., if you upgrade from 3.6 to 3.7, or downgrade to earlier versions, you are still advised to manually verify the hashes. This feature will be fully effective when upgrading from 3.7 and beyond.
Upgrading from version 3.7, introduces the following differences to the upgrade process:
-
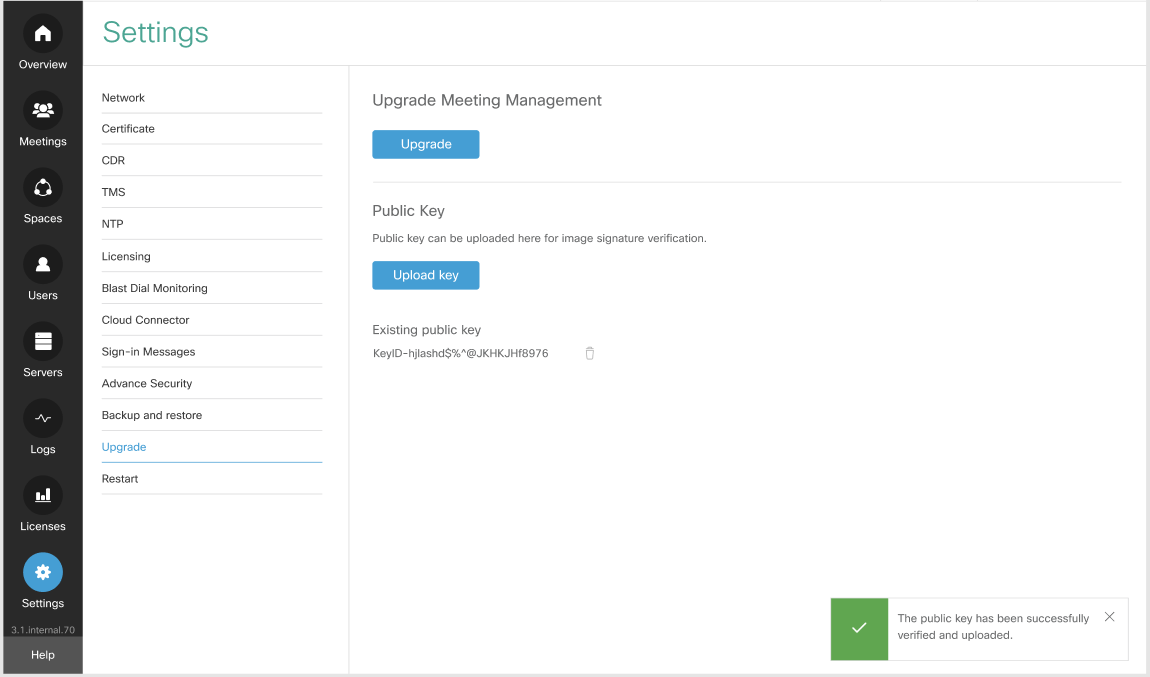
Upgrading to a special build will require uploading a special key. A new Upload Key button is introduced to enable administrators to upload the public key and verify the upgrade images. However, the administrators will perform this action only when upgrading to a special build.
-
Upgrades from a signed production/ special build to another signed production build will not require any special action from the administrator. Meeting management verifies the upgrade images automatically without the need for manual verification of the hashes.
-
On upgrading to an unsigned image, you are warned and asked to confirm whether you want to proceed (this behavior is required for downgrades).
-
If the image has been tampered with, the upgrade is prevented.
To upgrade to a special build:
The public key can be uploaded using the Upload key button available in the Upgrade page. A notification is displayed once the selected public key is verified and uploaded successfully. There is an option to override or delete the uploaded public key.
To upgrade Meeting Management, use Upgrade button by navigating to Upgrade page in the Settings tab. The upgrade file has to be uploaded using the Upload upgrade file button available in the Upgrade pop-up. Once the upgrade file is uploaded, Meeting Management validates the upgrade image against the uploaded public key.
Note: When upgrading using an Engineering Special release build after the upgrade file is uploaded, Meeting Management validates the upgrade image against the uploaded public key.
How image signing works
Upgrade images include a signature generated by a secure internal Cisco server which restricts access to the private key. The public key is stored inside the image of the running Meeting Management and is used to validate signatures. The signature is then used to validate the authenticity of the whole image.
Uploaded public keys are listed below and administrator has an option to delete any uploaded key.
Signed image file naming convention
The following convention is used in the image filename:
[release_name]_s<s/p><a/b/…>.img
where:
[release_name]: is the release name
_s: indicates that the file is signed
<s/p>: indicates if the image is Special/ Production
<a/b/…>: indicates the key version
Note: Upgrade images may be renamed before being uploaded to Meeting Management so their names should not be relied upon to determine the image type.
Key file naming convention
The following convention is used in key filenames:
CMM_key[_extra_info]_<a/b/...>[_master]_<DEV/SPECIAL/RELEASE>.pem
where
[_extra_info]: optional key information for SPECIAL keys, to identify the target (EFT, customer name).
<a/b/…>: key version
[_master]: indicates this is a MASTER key
Note: Key files may not be renamed. Renamed keys will be rejected by the Meeting Management.
File naming examples
Points to note:
-
_spa suffix denotes a production image which will be verified with a key internal to Meeting Management.
-
the key version may change if there is a need to rotate the keys.
Only beta or Engineering Special release builds will be signed with a SPECIAL key. Production builds will always be signed with a RELEASE key. Some useful information about builds signed with a SPECIAL key:
-
a typical file name example is: upgrade_ssa.img
-
before upgrading to one of these, the SPECIAL key will need to be uploaded to the Meeting Management. Use the Upload key option on the Upgrade page to add the SPECIAL key.
-
upgrades from a release signed with a SPECIAL key to 3.7 or any later release, will not require any special action from the administrator.
Accessibility improvements
In version 3.7, Meeting Management introduces the following accessibility improvements:
-
Users can navigate through all the options on the left pane of the main page using arrow keys on keyboard.
-
Users can now navigate and access the Sign out button under the Local/admin option using the keyboard.
-
All tabs in the Users page now displays meaningful text or symbol to indicate if they are mandatory/required fields.
-
The following elements in the Meeting Management are now announced appropriately by the screen reader:
-
Checked/ unchecked checkboxes in Users and Network Settings pages.
-
UI options such as Meeting Search criteria on the Meetings page.
-
Sign In button on Login page.
-
Menu buttons in the users' profile option, expanded/ collapsed properties of a button in the Users page, and all the toggle buttons in the Space page.
-