Licensing
On the Settings page, Licensing tab, you can choose the licensing mode. If you have chosen Smart Licensing, you can also configure some of the Smart Licensing settings here.
You must choose a licensing mode. Choose between:
-
Smart Licensing (recommended)
Your license status may show as out of compliance until you register with the Cisco Smart Software Manager and set your license allocations.
When you choose Smart Licensing, then Meeting Management gets information about purchased licenses from the Cisco SSM.
Note: There is no CLI (command line interface) for the Meeting ManagementSmart Licensing integration. This is by design as Meeting Management provides a graphical user interface.
-
No licensing
This option is only for resilient deployments. Choose this option if you have a resilient deployment, and you have enabled either Smart Licensing on the other instance of Meeting Management.
Note:
- The Traditional Licensing option is grayed out for users who were using this licensing mode in previous versions of Meeting Management.
- Meeting Management has deprecated the support for local license files (traditional licensing mode). Traditional Licensing option is no longer available in Licensing Mode pop-up once you migrate to Smart Licensing.
- After you change licensing mode or add a new cluster, it may take up to 5 minutes before the changes affect the license status for connected Meeting Servers.
How to enable Smart Licensing
To enable Smart Licensing:
- Sign in to the Cisco SSM and generate a registration token.
Note: While generating the registration token, ensure that you select Allow export-controlled functionality on the products registered with this token option to enable higher levels of product encryption functionality. For more information, refer Smart Software Manager On-Prem User Guide
- Copy the token to your clipboard.
- Open the instance of Meeting Management that you want to use for license reporting.
- Go to the Settings page, Licensing tab.
- Click Change.
- Choose Smart Licensing and Save.
- Click the Register button.
- Paste the registration token.
-
Optional: Register this product instance if it is already registered
Usually Cisco SSM will not let you register an instance of Meeting Management that is already registered. If you check this check box, then Cisco SSM will let you register the same instance again. This is useful if your Meeting Management has lost the registration details, for instance if you have tried to deregister and Meeting Management could not reach Cisco Smart Software Manager while deregistering.
- Click Register.
- When you have registered, check how many licenses you have in your Virtual Account.
- In Meeting Management, go to the Licenses page.
-
Enter information about the licenses you have in your Virtual Account.
Note: If you want to test Meeting Management and don't yet have licenses, then you can click Start trial instead.
Note: If you do not have any licenses of a specific type, enter 0 rather than leaving the field blank.
Note: After you update the licensing mode or add a new cluster, it may take while before Meeting Management has fetched all the usage information to update the license status. This can take from a few minutes to over 15 minutes, depending on the speed of your connection and the volume of data.
Note: Every time you change the number of allocated licenses, it may take up to 5 minutes before the changes affect the license status for connected Meeting Servers.
Smart Licensing actions after Smart Licensing has been enabled
You can do the following:
- Renew Authorization Now: The system automatically renews your authorization daily, at midnight UTC. However, if you want to renew manually, you can do that here. This is useful if you have purchased new licenses or allocated more licenses to the Virtual Account for this Meeting Management, and you want to see the changes in Meeting Management immediately.
- Renew Registration Now: The system automatically renews your registration every 6 months. You may want to renew the registration manually if you have moved licenses to or from the Virtual Account for this Meeting Management, or if you have moved this instance of Meeting Management to a different Virtual Account.
- Reregister: You can reregister manually if you want to use different Virtual Account with this instance of Meeting Management.
- Reserve Licenses: Smart Licensing enables you to activate and manage licenses using your Smart Account. You can activate a product instance by generating a token in Cisco Smart Software Manager and reserve licenses required for the product instance. Smart Account ensures that the selected product instance is in compliance and is authorized with enough licenses to support the current license requirement across all devices. For more information check this section.
-
Deregister: You can deregister this instance of Meeting Management if you want to use the Virtual Account for another deployment, or if you have a resilient Meeting Management deployment and want to use the other instance for reporting.
Note: If you change the licensing mode, then Meeting Management will automatically disable Smart Licensing and deregister from the Cisco Smart Software Manager.
Note: If you have lost connection to an instance of Meeting Management then you can also deregister from the Cisco SSM.
License Reservation
To be compliant with SMART, Cisco product users require support for License Reservation. Meeting Management supports license reservation from version 3.4 onwards. In an environment where Meeting Management cannot connect to the Internet due to security reasons, License reservation can be used to activate features and reserve licenses.
The feature has two variants: Universal (Permanent License Reservation) and Specific (Specific License Reservation).
-
Universal variant: Universal or Permanent License Reservation (PLR) provides a single license that enables use of all features in the product. PLR is only available for Military/Defense customers.
-
Specific variant: Specific License Reservation (SLR) provides you with a choice to reserve licenses based on your requirement. In addition to feature licenses, user licenses such as SMP Plus and PMP Plus can also be reserved. If license usage changes, this feature allows updating or changing the license reservation.
License reservation can be changed from Universal to Specific variant and vice versa. This involves returning the reservation and re-registering the product instance.
Note: The license reservation feature is not enabled on customer Smart Accounts by default and must be specifically requested by the customer and approved by Cisco. Both types of License Reservation require Cisco to authorize the Smart Account. You must have a Smart Account for your company with a dedicated Virtual Account that will be used by only one instance of Meeting Management. To request an account, talk to your Cisco account team or go to Cisco Software Central.
License reservation allows the following workflows:
License Reservation
The workflow for initial license reservation is as follows:
-
Confirm that the Smart Account is License Reservation enabled
-
Generate a Reservation request code from Meeting Management
-
Enter the code in Cisco SSM
-
In case of SLR, select license to be reserved
-
Generate a Reservation Authorization Code in Cisco SSM
-
Enter the authorization code in Meeting Management
Figure 7: Workflow for License Reservation

Follow these steps for license reservation:
In Meeting Management Settings, go to the Licensing section:
Click the Register button to open Smart Software Licensing Registration pop-up.
Click the start here link at the bottom of the pop-up to initiate the license reservation process.
In the pop-up window that opens, click Yes, My Smart Account is License Reservation Enabled.
In the Smart License Reservation pop-up, click Generate button to generate Reservation Request Code.
Save or copy the Reservation Request Code that is generated.
Click Close. In Smart Software Licensing page of Meeting Management, the Smart Software Licensing Status will be displayed as License Reservation Pending.
In Smart Software Manager
Log in to Cisco Smart Software Licensing Manager using your Smart Account
Navigate to the desired Virtual Account and click License Reservation
Note: Use of license reservation requires specific permission from Cisco. For this, user has to make sure License Reservation button is available inLicenses tab under Inventory section of Smart Software Manager.
Enter the Reservation Request Code.
Choose licensing from Licenses to Reserve:
For PLR - Select option Meeting Server PLR Enablement
For SLR - Select option Reserve a specific license and select the specific licenses to be reserved.
Click Generate Authorization Code button to generate the Reservation Authorization Code.
Save or copy the Reservation Authorization Code.
Note: In case of Specific licensing, on selecting Reserve a specific license in Licenses to Reserve, user can view a list of available licenses. Ensure to select enough quantity of licenses while requesting in the Smart Account.
In Meeting Management, perform the following steps:
In Smart Software Licensing page, open Enter Reservation Authorization Code pop-up.
You also have an option to view reservation request code or cancel Reservation Request
Enter the Reservation Authorization Code generated from Smart Software Manager and click Install Authorization Code/File button to complete reservation.
In the Licensing section, the Registration status under Smart Software Licensing Status will change:
from License Reservation Pending to Registered - License Reservation
and License authorization as Authorized - Reserved.
The license status in the Licenses page will be displayed as:
Reservation Active for PLR
Reserved along with the number of licenses for SLR.
Update reserved licenses
To meet the changing needs of your organization, you can update specific licenses or you can change the number of reserved licenses. For example, your current license requirement is 5 and you want to add another 5 licenses, then you need to select the number of licenses as 10 and the new value overrides the prior value.
Note: Updating licenses is not applicable in case you are using PLR. However, you can change your license reservation type from PLR to SLR or vice versa. To change the type of license reservation, return the reserved licenses, unregister the product instance, and reregister the product instance from scratch. When changing your reservation from PLR to SLR, the selected licenses in SLR will override PLR licenses.
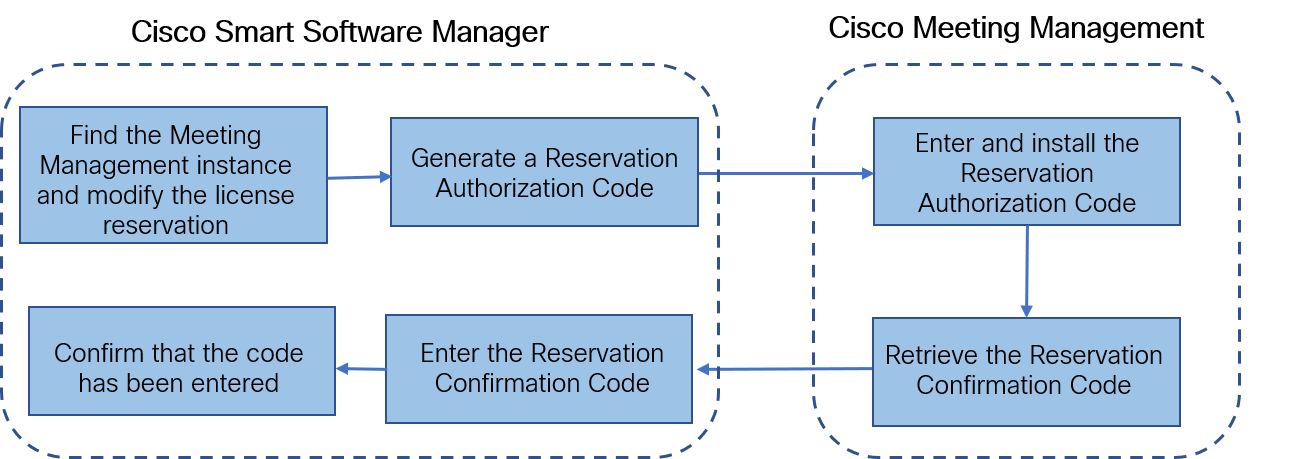
The workflow for updating reserved license is as follows:
Find the license instance to be updated in Cisco SSM
Generate a Reservation authorization code
Enter and install the code in Meeting Management
Generate a Reservation confirmation code
Enter and confirm that the Reservation confirmation code in Cisco SSM
Figure 8: Workflow for Update License Reservation
Follow these steps to update the reserved licenses:
In Smart Software Manager:
Find Cisco Meeting Management instance from the Product Instances and select Update License Reservation from the Actions menu.
Use the Update License Reservation pop-up to modify the licenses to be reserved and generate a new Reservation Authorization Code.
Save or copy the Reservation Authorization Code.
In Meeting Management Settings,
Navigate to the Licensing section and click on Update Reservation button.
Enter the Reservation Authorization Code in the pop-up that gets open on clicking Update Reservation button.
Note: In case the Meeting Management instance has reserved a Universal license, to update license reservation, return this license using Return Reserved Licenses button in Licensing section and then reregister the product instance.
Click Install Authorization Code button to update license reservation and to generate a Reservation Confirmation Code.
Copy or save the Reservation Confirmation Code by clicking View confirmation code button in Smart Software Licensing page.
In Cisco Smart Software Manager,
Find Cisco Meeting Management instance in Product Instances and select Enter Confirmation Code... from the Actions menu to launch the Enter Confirmation Code pop-up.
Enter the Reservation Confirmation Code into the Enter Confirmation Code pop-up.
Return to the Smart Software Licensing page in Meeting Management and click Code Has Been Entered button to dismiss the alert that was placed after the Reservation Authorization Code was installed.
Returning reserved licenses
You can return the reserved licenses to theVirtual Account so that the licenses can be used by other product instances. To return licenses, follow the steps described in this section.
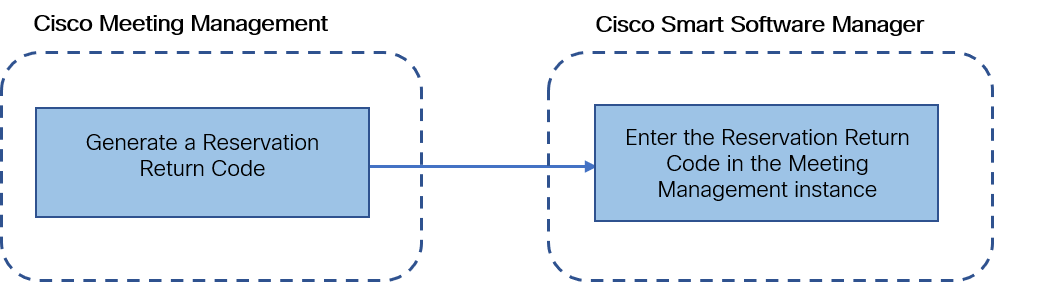
The workflow for returning a reserved license is as follows:
Generate a Reservation return code
Find the Meeting Management instances in Cisco SSM
Enter the Reservation return code
Figure 9: Workflow for Returning License Reservation
Follow these steps to return reserved license:
In the Licensing section of Meeting Management Settings,
Click Return Reserved Licenses... button to launch the Confirm Return Licenses pop-up.
Click Generate button to generate a Reservation Return Code.
The License Reservation Return Code pop-up provides instructional text and allows to copy or download a file containing the License Reservation Return Code.
In Smart Software Manager,
Find the Meeting Management instance in Product Instances
Select Remove from the Actions menu to launch the Remove Product Instance pop-up.
Enter the Reservation Return Code into the pop-up to complete returning reserved licenses. The Registration status is changes to Deregistered in the Licensing page.
Things to consider while migrating to Smart license
Existing traditional licensing files (PAK files) can be used for upgrading to 3.4 version.
Customers with existing licensing files (partially or fully fulfilled PAK) will need reference to originally purchased PAK to convert PAK license to Smart Licensing. You will have to open a new Global Licensing Org (GLO) request for manual conversion to Smart Licensing by providing the Smart Account name, domain, and virtual account in use.
Note:
• Self-service for converting PAK to Smart Licensing using Cisco SSM is only available for new customers.
• Converting existing licenses to Smart license must be done with help of GLO team and might cause delay.You should plan to convert your licenses to Smart Licensing a few days before upgrading to 3.4 version to prevent the requirement of using the one-time 90 day trial mode.
Ensure that your Smart Licensing Virtual Account has enough licenses for Meeting Server usage in last 90 days. In cases of overuse, Meeting Management will enter high enforcement alarm mode on conversion to Smart Licensing. If you are in high enforcement alarm mode, Meeting Management allows one time 90 day trial to silence alarm, giving time for you to purchase additional licenses.
Virtual edition CMS activation licenses (LIC-CMS-K9) cannot be converted to Smart Licensing, instead Cisco SSM automatically counts the number of Call Bridges in use and reports it under Call Bridge Active Nodes on the Smart Account. Customers will only be able to view the number of Call Bridges in use and cannot add new Call Bridges licenses.